We’ll present you how to develop a pallet wood wall with this action-by-action tutorial.
When you’ve finished, use your leftover pallet wood to make wooden hearts and property dominoes, or to develop objects to manage your property.
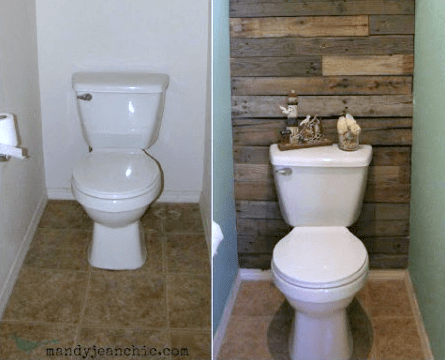

Mandy Jean Chic shares this tutorial for adding a pallet wall in a compact lavatory, but the course of action is very much the similar for any wall in any home. Use fence slats, barn wood, pallets, no matter what previous lumber you can get your palms on! Look at for Mandy’s insider strategies (marked in bold) so adding your pallet wood wall will go easily and finish fantastically.
How to Make a Pallet Wood Wall
Move one: Consider Aside the Pallets
The most difficult section of this task, by significantly, is not breaking the boards when dismantling the pallet. Be confident to use your safety gear and try to preserve a number of of the previous nails to reuse to make your pallet wall glance authentic. Gloves and eye protection are a must for this task!
Related Reading through: How to Consider Aside a Pallet Without having Dropping Your Brain

Move 2: Measure your wall and wood
Come across the sq. footage of the wall by getting the peak and width of the wall in toes (round up to the up coming foot for simplicity) and multiply the two quantities. Then lay out the boards and evaluate them to assure you have adequate to deal with the needed sq. footage on your wall. Laying them out also gives you an strategy of how they will in good shape together on your pallet wall.

Move 3: Paint the wall
Paint the wall at the rear of the wood since in this software there will be cracks and gaps that add to the rustic glance. For this wood, a blue gray or silver would have improved the blues and grays in the solar-bleached weather-uncovered wood. Browns would make the wood glance additional utilised but not as previous. We utilised black to get the glance of emptiness at the rear of the pallet wood wall. No make any difference the coloration you go with, it is vital to use a flat sheen to limit any glow. It ought to glance like an previous wood wall, not a new shiny wall coated by previous wood.

Move 4: Begin adding boards to the major of the wall, do the job only section way down
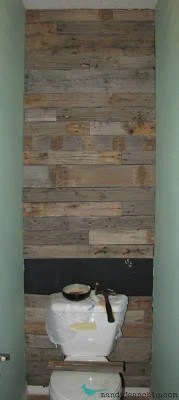
Making use of a excellent adhesive (liquid nails) and a number of of the previous nails, commence at the major of your pallet wall and do the job your way down. Walls are never correctly sq. so get size measurements for every single row. Stagger some of the boards by cutting at distinct lengths, becoming confident to pair up boards of matching heights. Use a number of full-size boards to add security to the random pattern. It is also vital to assume a number of ways in advance and lay out your up coming number of boards to match up the heights. If a board you location is a great deal taller or shorter than the a person you are pairing it to, you will have a quite uneven gap. Little gaps can add to the glance, but gaps that are much too massive will go away your pallet wall seeking poorly thought-out.
Move five: Begin adding boards from the base up to make room to mix in a limited board or two
Probabilities are your boards will not in good shape evenly major to base on your wall and you will will need to minimize a board horizontally to match the peak of the very last gap on the pallet wood wall. As we have been operating in a lavatory, positioning this shorter board at the rear of a set object like the rest room served it be less noticeable. We also minimize two boards 2 inches shorter as an alternative of shortening just a person board by 4 inches. We spaced out the shorter boards and they really do not capture your eye at all!

And that is how to develop a pallet wood wall! Doesn’t the finished products glance great?! No additional dull, flat wall and so much extra texture and heat and identity!
Love this glance? Click on the backlinks under to check out additional reclaimed wood projects we’ve showcased.
Please pin this for later on and also arrive follow together with us on Pinterest, Fb, Instagram or YouTube for tons of remodeling, decorating and building tutorials.

At first printed 03.23.2013 // Up to date 04.thirteen.2019